Indoor. Outdoor. Concrete Tables.
A tutorial by


- 4 – H-Frame Table & Bench Legs, in desired sizes and finishes (we used 28"x12" and 20"x12" in raw steel—for outdoor use, we recommend our rust-resistant powder-coat finishes)
- Plywood
- 1x2 lumber
- Tape measure
- Pencil
- Straightedge
- Clamps
- Circular saw
- Orbital sander and sanding disc, optional (to adjust lumber for a tightly fitted form)
- Drill/driver and bits (we used a 3/8" masonry bit)
- Painters tape, optional (to mark your drill bit to avoid drilling too far)
- Screws (we used #8 x 2-1/4" deck screws for the forms, and 1-1/2" masonry screws to attach our legs)
- Caulk and caulk gun
- Concrete mix (we chose a post concrete for the pebbles and quick dry time) and mixing supplies
- Rebar or mesh supplies to reinforce your tabletops, if needed (see below)
- Hand trowel
- Hammer
- Shovel
- Sanding and finishing supplies, if you'd like to finish your tabletops (see below)
- Safety gear such as eye protection, a mask/respirator, and gloves
A few things to consider when planning your build:
- Reinforcement. The tables we built were small, so we decided to not use any internal reinforcement. If you want to create a larger table, or a tabletop that will bear weight, you’ll want to reinforce the concrete. To do so, pour a small first layer of concrete into your form, place rebar or wire mesh, and finish pouring the concrete.
- Concrete dry time. Be patient while waiting for your concrete to dry. While our bag of concrete said it would set within a few hours, we waited overnight to make sure we had as solid of a surface as possible before we took it out of the forms.
- Finishing your concrete. Surfaces used every day or outdoors should see some sort of treatment. If you want a smooth finish, fill in the holes with concrete filler, and sand to your desired level of smoothness. A concrete sealer coated on top will protect your slab for years to come.

Mark Won
I love using recycled/upcycled material to build beautiful furniture fit for any modern home. Officially, I’m a Semi Exact employee, but tinkering and DIY has been a hobby since childhood. Added dream job bonus: pursuing my love of interior design.
I hope to learn from the many skilled makers out there, and to turn my builds up a notch!


Step 1:
Cut wood for concrete forms
Start by measuring out the dimensions for your tabletop forms (we went with 34" x 12" for our larger table, and 24" x 12" for our smaller table). Cut the plywood and 1x2s with a circular saw to create the pieces for the sides and bottoms of your forms.

Step 2:
Adjust pieces if needed
Some of the wood pieces may need to be sanded a bit for a snug fit. The better job you do with measuring and cutting, the less you will need to adjust.

Step 3:
Assemble the forms
Once you have all the pieces cut for the form, you can start assembly. We chose #8 x 2-1/4" screws to drill the 1x2s into place. We picked this diameter and length to allow enough for the wood to stay together, but not to crack our form with a screw that was too large.
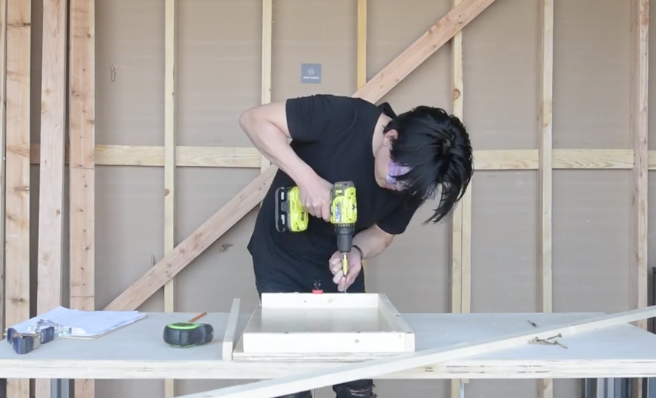
Step 4:
Drill in your side boards
We recommend using clamps to keep the wood in place while drilling. This will prevent any wobble and uneven drilling. After double-checking to make sure your clamps are secure, you can drill the side boards into the plywood.

Step 5:
Caulk the forms
Add caulk along the inside edges. Pay extra attention to the form to make sure you get a perfectly plumb shape. Be sure to take your time with the caulk (so the runnier concrete doesn’t seep into the cracks). The more time you spend here, the less time you’ll spend working on your finish. Slow and steady wins the race!

Step 6:
Smooth out the caulk
We used a caulk dap cap and, to be honest, our fingers. You want the thinnest possible bead in the seams, while still creating a secure seal. We spent about 10–15 minutes on this step alone. Extra effort here will help create tables with sharper edges (which is what we were going for).

Step 7:
Mix the concrete
Prepare your concrete by following the product instructions. We used a garden rake and general-purpose tub, and followed the directions (water-to-mix ratio) to get our desired consistency. If you use quick-setting concrete (as we did here), try to move as quickly as possible, because .... well, let’s just say this concrete mix is aptly named.

Step 8:
Mold the concrete
Keep a steady pace, moving briskly but not rushing. Shovel the concrete somewhat evenly across the forms, spreading it with a shovel. If you want to create a larger table, or a tabletop that will bear weight, you’ll want to reinforce the concrete. To do so, pour a small first layer of concrete into your form, place rebar or wire mesh, and finish pouring the concrete.

Step 9:
Smooth the concrete
After making sure every nook and cranny is filled, start smoothing the top with a hand trowel. Lightly tapping the bottom of your molds (25–50 times) with a hammer or mallet will help bring air bubbles to the surface. Take your time here to ensure even lines and edges. Wipe out the concrete in your screws to save time and headache when removing the forms.

Step 10:
Remove the forms
Time for the big reveal! Unscrew your form, and gently slide the concrete out. If the mold is being stubborn, give the wood some tiny taps with a hammer until it’s loose enough to pull away. If desired, finish your concrete tops before attaching your legs.

Step 11:
Wax raw steel legs
We recommend a powder-coated finish for use outdoors or in humid environments. We wanted a natural patina to develop over time on our legs, so we opted to use paste wax (included in your raw steel order) to protect the steel from rust. You can skip this step with our clear or color powder-coated finishes.

Step 12:
Attach your legs
Measure out your leg placement and mark the slots. Remove the legs, and drill pilot holes with a masonry bit. Marking your drill bit with a piece of painters tape can help ensure you don't drill too far. Reposition the legs, and drive masonry screws through the slots into the concrete to secure your legs.

Step 13:
Enjoy your tables!
Double-check that the legs are secure, and add the leveling feet (included with your tube steel leg purchase). Have someone help you turn the tables right side up, to help ensure the fasteners don't pull away.
A little patience and a lot of elbow grease pays off! Be sure to give yourself a big round of applause for this one.