From Barn Door to Dining Room Table, an Old Piece Transformed.
by Ella Groff, Social Media & Community Lead at Semi Exact
I recently moved into a new apartment and found myself with the common dilemma- a lot of space and very little furniture to fill it.
Although my old dining table was nostalgic (the first piece of real furniture I had owned) it was just too small for our new dining room. While on the hunt for a new dining table, I knew that I wanted to build something that would last and could easily be modified to work in different spaces the next time we moved. I also knew that I wanted to use 28” Spider Legs in Jet Black Satin for my table base to give the entire project a mid-century inspired feel.

Armed with my small arsenal of tools and an active imagination, I made a trip to my local re-use store in search of a tabletop option. I was open to anything - weird old window? Bowling alley lane? Why not.
Ultimately, I was able to find a super-sturdy, well-maintained barn door that measured just over 6’x 3.5’. Although maybe a more simple solution than I was originally planning, the door was not only the perfect size for our new space, but was also high quality and would require very little repairs. There were so many items that made me stop and think; like the large sections of bowling alley that would make an amazing table, just not for my 3rd story, no elevator apartment.

Here's the barn door I snagged. This is the backside and the front is smooth without the diagonal cross piece.
Although the barn door definitely wasn’t “mid-century” like the Spider Legs, I decided that a fresh paint job would do the trick to modernize it. I took a quick trip down to my local hardware store and picked up..

- 1 Random Orbit Sander
- 1 pack of 150 and 220 grit sandpaper (here's the assorted pack that I used)
- A single 1”x4”, cut into two 12” pieces
- 40 - 1 ¼” wood screws
- 1 quart of Valspar Medallion satin paint in “Nature Lover” green ( a gallon is shown here, but a quart would be more than enough for a typical tabletop)
- 1 9'x12' paper drop cloth
- 1 metal carpenter square
- 1 tape measure
- 1 roll of shop towels (similar to paper towels, but more durable)
And then I got to work.
The barn door had two thick layers of paint on it, so I needed to sand it down before I could start painting. I started with the 150 grit sandpaper, paying extra attention to areas with exceptional peeling or splintering, and then finished off with a final pass using the 220 grit sandpaper. This entire process took close to an hour but I wanted to ensure that the new layer of paint would apply smoothly and stay there. As you can imagine, the sanding process kicked up quite a bit of dust; If you’ll be sanding for a while (like I was) it’s important to wear a mask to protect your lungs. So put on that podcast, strap your mask on and get to work preparing your surface.

Here's the table surface after sanding. I sanded just enough to remove the topmost glossy finish and smooth any peeling sections.
Next, I wiped the dust off using a shop cloth and started painting. Although I love a matte finish, I chose a satin based paint that would have greater longevity for a surface that will be in constant use. After two coats of paint, each taking approximately 20 minutes with an hour break in between, I set my fans on high and watched it dry… just kidding, the drying time is the perfect opportunity to catch up on emails. 
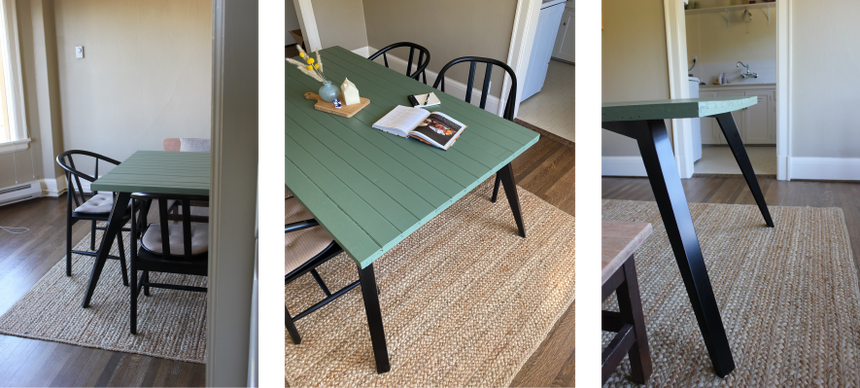
I chose this this dusty forest green to compliment the glossy black legs. The green felt tranquil to me and adds a nice pop of color in the space.
After 1.5 hours when the second coat had dried and my inbox was empty, I flipped the table over to work on adding corner supports. Since it was previously a door, the top had one long cross section that spans from one corner to the other and a ¾” x 1” frame around the entire underside. You can probably see the problem now- if I were to just mount the legs to the table as-is, the two opposite corners would be ¾” shorter, creating a forever wobble. Not ideal.

Enter my two 12” 1”x4” pieces. Using a square and some very careful measuring, I lined these two pieces up along the opposite diagonal at the same angle as the other center support. Before I secured them, I made sure that I placed them close enough to the center of the table so that my Spider Legs would line up where I wanted them to. This part was tricky and the most time consuming of the entire build (aside, of course, from waiting for the paint to dry). For anyone replicating this project for themself, I would recommend drawing a straight line from one corner diagonally across to the other, and then using this to line up your legs at the same angle. This should save you some of the headache I experienced and at least half an hour.

Finally, I used the remainder of my 1 ¼” screws to secure my Spider Legs to the base. This part of the project was simple. The Spider Legs are made from a super sturdy recycled steel and have a high quality powder coat finish, giving the whole piece a polished look.

Once the legs were attached, I flipped the table over, cleaned up all of my tools, and sat down to plan my first meal at my new table.
Before buying a new piece of furniture, it’s worth taking a second to think about how you can repurpose or reuse something else to build the piece of your dreams. All it takes is a little creativity and it saves not one, but 2 pieces from the landfill.

More than that, I look at my table every day and feel a sense of immense accomplishment, satisfaction, and pride. It’s certainly not perfect, but it is a reminder that I can tackle something that’s just a bit outside my comfort zone. And if anyone asks me where I got it, I get to share the story of how I made it, which is really the best part, isn’t it?
If you're interested in watching the table come together, find the full build video here.